A5+ Classic Speakers — Audioengine Skip to Content
A5+ Classic Speaker Review
Tech Specs

A5+ Home Music System

The foundation of the Audioengine family, the A5+ Home Music System will fit on your shelf, but fill up the room. And with no network setup or passwords to enter it doesn’t get any easier—or sound any better—than this. From hip-hop to heavy metal, symphonic to spoken word, the A5+ is a master of all trades.

Pro Tip Pair the A5+ Classic with the Audioengine D1 DAC for desktop applications. This bypasses your computer's lower quality audio components, with the D1 DAC significantly enhancing the sound quality.

Technical Specifications

General Specifications

Type
Powered speaker system

Amplifier Type
Class AB

Power Output
150 W peak power total (50 W RMS / 75 W peak per channel), AES

Drivers
5" aramid fiber woofers

0.75" silk dome tweeters

Inputs
3.5 mm stereo mini-jack, RCA L/R

Outputs
RCA variable line-out, USB (power/charge)

Input Voltages
115/240 V, 50/60 Hz manually switchable

SNR
>95 dB (typical A-weighted)

THD+N
Less than 0.05% at all power settings

Crosstalk
<50 dB

Frequency Response
50 Hz-22 kHz ±1.5 dB

Frequency Response w/ Bass Reduction Switch selected
N/A

Analog Input Impedance
N/A

Nominal Impedance
N/A

Input Impedance
10K ohms unbalanced

Crossover Frequency
N/A

Protection
Output current limiting, thermal over-temperature, power on/off transient protection, replaceable external main fuse

Power Consumption
Idle: 10 W
Mute: 6 W
Sleep: 4 W

Standby Consumption
N/A

Phase
N/A

Recommended Amplifier Power
N/A

Battery Life
N/A

Battery Charge Time
N/A

Bluetooth Specifications

Internal D/A Converter
N/A

Internal BT Receiver
N/A

Input Bit Depth
N/A

Bluetooth Receiver Type
N/A

Supported Codecs
N/A

Supported Bluetooth Profiles
N/A

Wireless Operation Range
N/A

Input Data Rate
N/A

Wireless Latency
N/A

Power

Connector Type
Standard USB

USB Device Class
USB 1.1 or above

Input Bit Depth
N/A

Input Sample Rate
N/A

Headphone Amp Specifications

Headphone Amp Type
N/A

Full-scale Headphone Output Level
N/A

Output Impedance
N/A

Recommended Headphone Impedance Level
N/A

Optical Specifications

Internal D/A converter
N/A

Input Bit Depth
N/A

Sample Rate
N/A

Weights And Measures

Dimensions (HWD)
Left (active) - 10.75" (27 cm) x 7" (18 cm) x 9" (23 cm)
Right (passive) - 10.75" (27 cm) x 7" (18 cm) x 7.75" (20 cm)

Weight
Left (active) - 15.4 lb (7 kg)
Right (passive) - 9.6 lb (4.4 kg)

Total Shipping Weight
31 lb (14 kg)

Shipping Box Dimensions (LWH)
22" (56 cm) x 11.5" (29 cm) x 15" (38 cm)

Environmental Requirements

Operating temperature: 32 degrees F to 95 degrees F
Non-operating temperature: -4 degrees F to 113 degrees F
Relative humidity: 5 - 95% non-condensing

Materials And Construction

0.5" (13 mm) thick MDF cabinets
5" (130 mm) aramid fiber woofers with advanced voice coils
0.75" (20 mm) silk dome tweeters with neodymium magnets
Toroidal power transformer

Cabinets

To minimize unwanted resonances and distortion, Audioengine cabinets have thick high-resin MDF walls with extensive internal bracing. Heavy internal sound-damping material is used to reduce unwanted sound reflections inside the cabinet. All cabinet edges are rounded which look great and reduce high-frequency diffraction effects on the front baffles. The A5+ cabinet contains tuned, rear-port slots.

Furniture Grade Finishes

The A5+ cabinets are available in several handsome finishes, including bamboo veneers as well as satin black and high-gloss white paint, offering a wide choice for complementing room furnishings.

Custom Components

Audioengine designs and manufactures our own tweeters, woofers, and other critical components. In other words, these are not “box built” speakers with off-the-shelf parts but custom-designed to our specifications. What we do not fabricate directly in our factory we have made to our designs (parts such as transformers, magnets, and wiring harnesses, for example). The cabinets, drivers, bass port designs, amplifiers, and crossovers are all painstakingly tuned together for each Audioengine model. This, in turn, makes for a much more efficient system that requires much less power than passive speakers and a separate integrated amplifier or similar A/V components.

Based On Studio Monitor Designs

Studio monitor speakers are used by producers and engineers in recording and production studios. They are designed with a theoretical flat frequency response which allows the engineer to create a final mix in such a way that the recorded music will sound good on most other speakers. Although Audioengine speakers are not designed to be up-close “nearfield” studio monitors, we do carry over much of the same higher-end technology, components, and design philosophy for all Audioengine speaker systems.

Efficient Integrated Design

The speaker cabinets, drivers, innovative bass port designs, amplifiers, and passive crossovers are all critically tuned together for each Audioengine model. This, in turn, makes for a much more efficient system that requires less power than passive speakers and a separate integrated amplifier or similar A/V components. We build all this goodness into the left speaker cabinet to make it super-easy to connect your smartphone, tablet, computer, TV, network player or any other audio product.

Usb Power

The Audioengine A5+ includes a 5V, 500mA USB power supply for charging portable devices, while listening to your music. The USB connector allows you to charge and power your Smartphone, Tablet, Audioengine wireless adapters or any other USB powered product. USB is for power only, not USB audio or data transfer.

Amplifier Design

The amplifiers in powered Audioengine speakers are located in the left speaker and are a conservatively-rated class A/B analog monoblock design. This is a more traditional speaker/amplifier marriage which provides excellent quality audio and greater flexibility. All circuit boards for the power and preamp sections are vertically mounted for maximum mechanical shock protection.

Driver Designs

Audioengine uses audiophile-quality, ferrofluid-cooled silk dome tweeters with neodymium magnets. Silk tweeters hold up well under high power and the edge-driven design gives very smooth response. The woofers are aramid fiber woven glass composite with rubber surrounds. Aramid fiber is obviously very strong, which means that the woofer retains its shape when being driven at high levels. The speaker materials and construction are robust enough to stand up to some serious thrashing, so speaker grills are not needed and they will sound and look great after many years of use.

Power Transformers

Power transformers are a large contributor to the overall audio performance, especially in the low end. Again, no off-the-shelf parts. Audioengine uses gapless core toroidal transformers which have a tighter radiated magnetic field, directly translating to lower noise. They are lighter than standard, lower-cost transformers and also generate less heat.

Shielding

Both drivers are directly video shielded and allow the user to place the speakers within a few inches of a video monitor. This shielding also offers protection for hard-drive digital music players.

Quickstart Guide

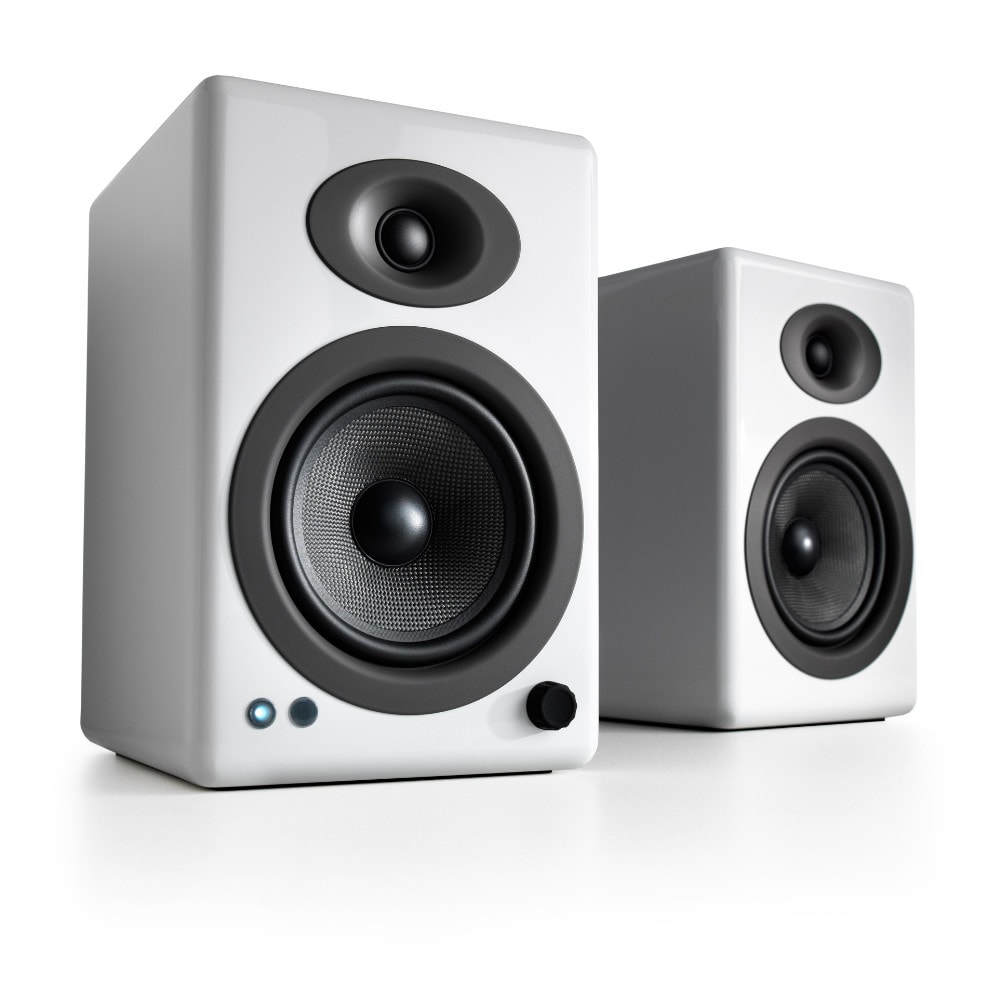
A5+ Classic Quick Setup

Step 1 - Speaker Placement

Although your Audioengine 5+ speakers are very forgiving with regards to placement, it’s true that proper speaker placement can have an impact on sound quality.  There seem to be different theories on correct speaker placement but rooms and tastes are different so it’s difficult to recommend a perfect setup. We do suggest you feel free to experiment to see what works for you.  As a general rule of thumb for the best soundstage and imaging, the speakers should be equidistant from side walls and a different distance from rear walls. Tweeters should be at about eye-level in your most frequent listening location and for the best bass response we recommend at least 6 inches of clearance between the rear of the speakers and the wall behind them.   Here are a few more suggestions, assuming you have some exibility regarding where you place your speakers. No need for concern if your situation and listening environment dictate the speakers’ position.

• Both speakers should be equidistant from your primary listening position.

• Placing the speakers at least 6 feet (1.8m) apart usually provides the best imaging.

• Try to keep the speakers near the front edge of shelves or cabinets.

• Allow at least 6 inches of clearance between the rear of the speakers and the wall or surface behind them.

• If you need to turn the speakers on their sides, position the tweeters toward the outside.

• If used on a desktop for computer speakers, it’s best if they are placed on a solid surface

Step 2 - Connecting the Speaker Wire

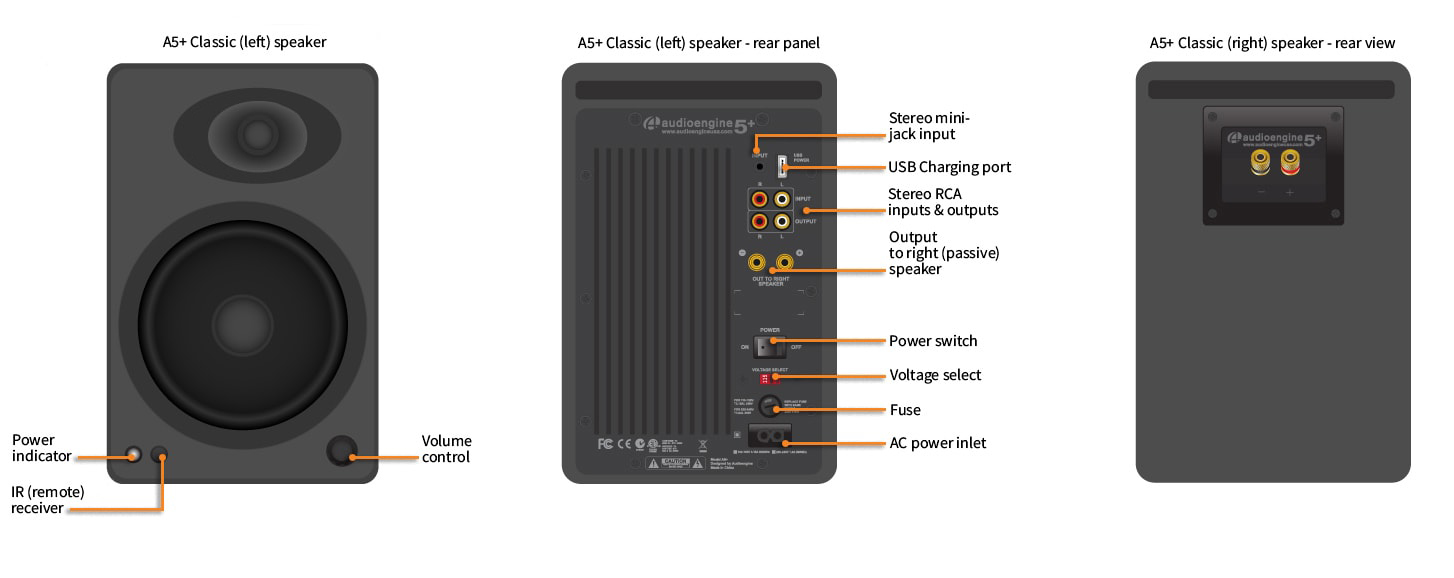
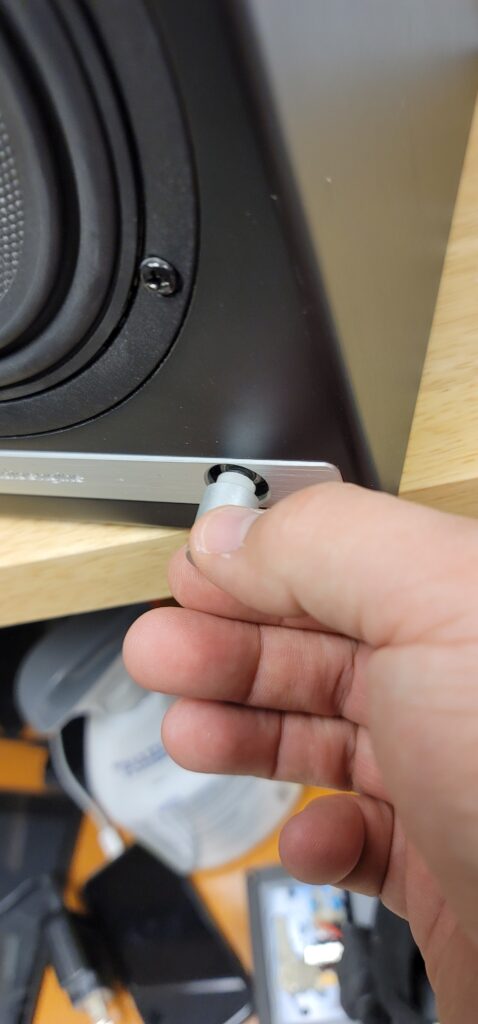
The Audioengine 5+ speakers have amplifiers built into the left cabinet and the included speaker wire is used to connect both speakers to each other. The A5+ uses high quality, ve-way gold plated binding posts that will accept heavy gauge bare wire, banana plugs, spade lugs, or pin terminators.

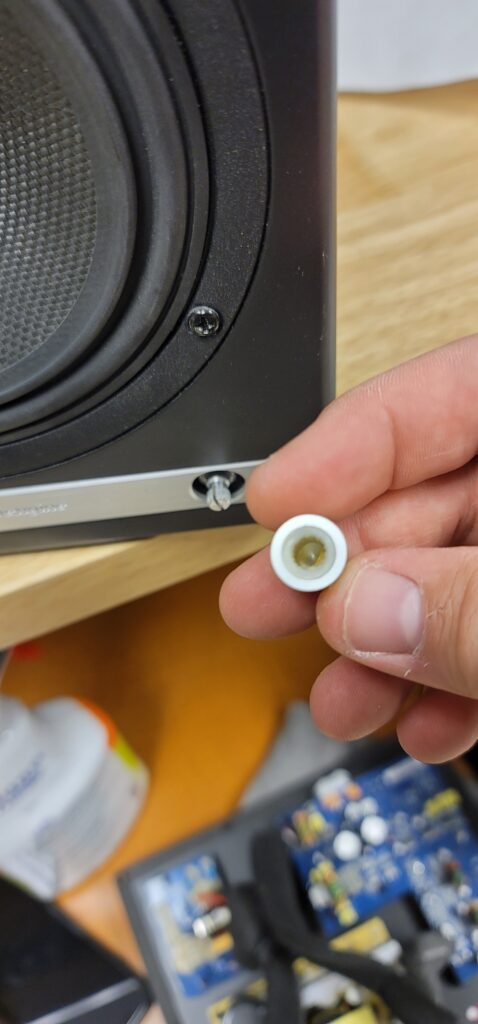
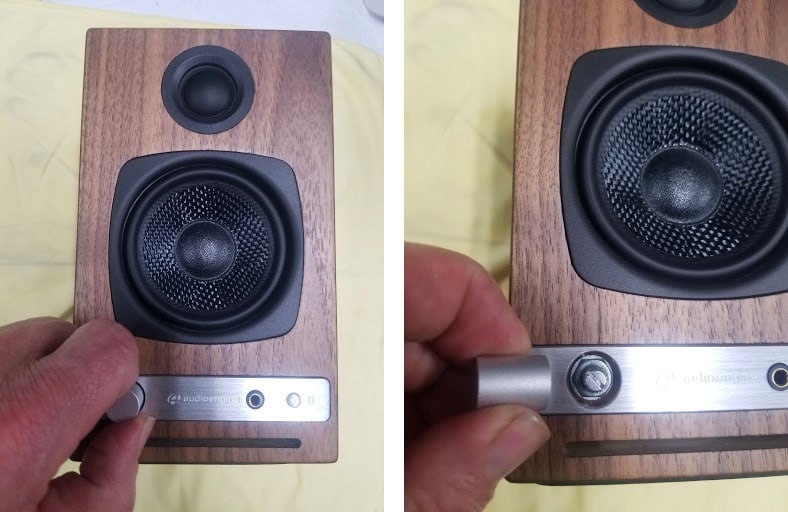
1) Use your thumb and finger to unscrew the binding post connectors on the back of each speaker.

2) Insert each speaker wire into the holes on the side of binding post connectors, making sure to connect the positive (+) terminal on the left speaker to the positive (+) terminal on the right speaker.

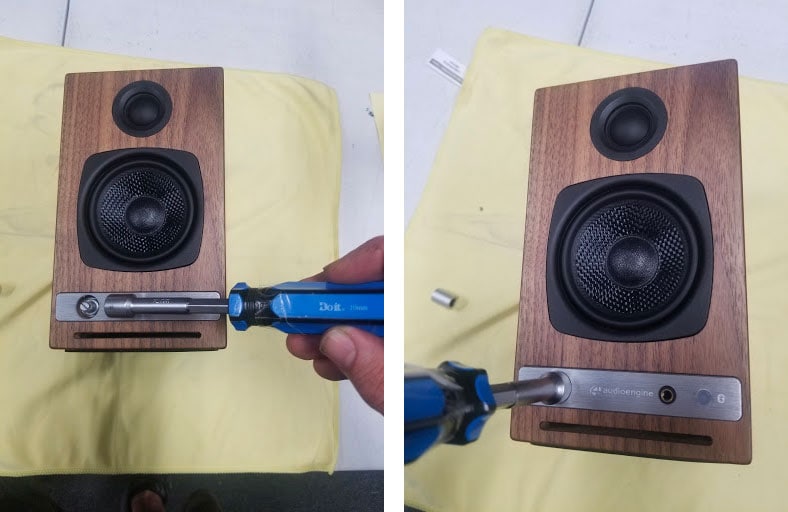
3) Retighten the binding posts with your ngers.

4) Verify that only the exposed portion of the speaker wire is secured rmly in each connector.

5) Make sure that none of the speaker wire strands have come in contact with an adjoining terminal.

Note:

As the Audioengine 5+ speaker system includes built-in power amplifiers, do not connect the speaker terminals to the speaker outputs of a stereo receiver or amplifier.

Step 3 – Connecting the Power Cord

1. Verify that the power switch on the left speaker rear panel is in the OFF position.

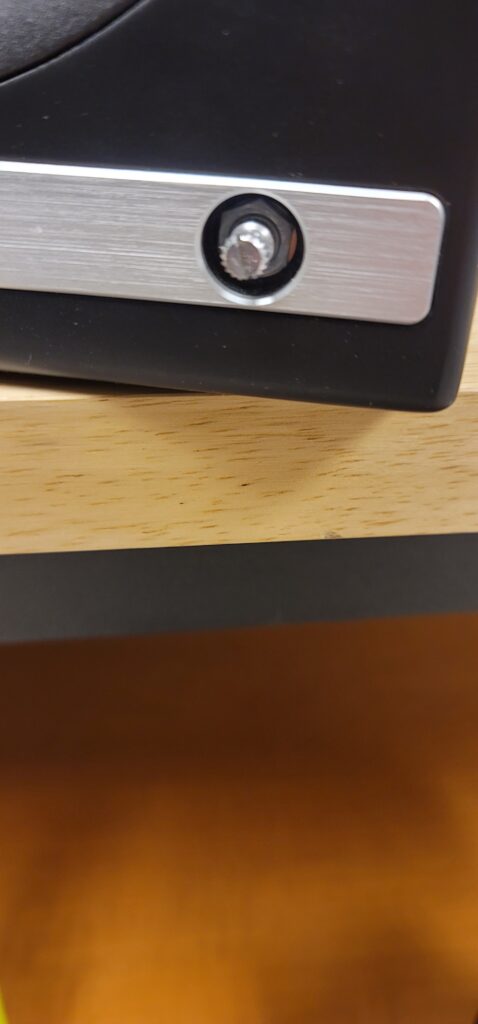
2. Conrm that the rear panel voltage selector switch is set to the proper voltage for your area.

3. Connect the power cord into the left speaker and the other end into an AC power outlet.

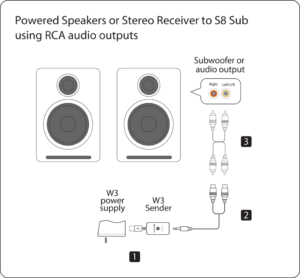
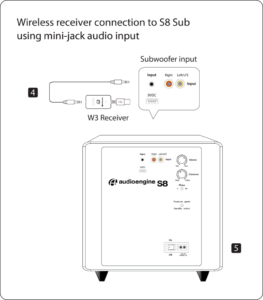
Note:We recommend using a high-quality surge suppressor and/or AC line filter on all electronics equipment.Step 4 – Connecting Audio CablesUsing the appropriate audio cable (3.5” mini-jack and/or RCA cable), connect your audio source (computer, iPod, etc.) to the A5+ audio inputs. One of each cable type is included.Note:

Both audio inputs on the A5+ are active so two audio sources may be connected to the speakers at the same time without the need for an input switch.

Step 5 – Operation

1. Move the A5+ rear panel power switch to the ON position. The left speaker front panel power indicator should ash a few times then go solid.

2. Turn on your audio input source and adjust the volume to the desired listening level.

3. Adjust the A5+ speaker volume level with the volume knob on the front panel or with the included remote control.


For the full setup guide, download the attached PDF:
A5_plus setup guide_web


A5+ Classic Setup Video

Troubleshooting

A5+ Classic Troubleshooting Tips

The following troubleshooting tips can help diagnose and correct most concerns with the A5+ Classic. We have attempted to make this list as comprehensive as possible, so some of these may not apply to your issue, but please go through each tip.

If the power indicator on the A5+ front panel is not illuminated, then try these tips:

  1. Verify that the AC power cord is connected to the speaker rear panel and to a working AC power outlet.
  2. Check that the speaker’s power switch is in the ON position.
  3. Check that the rear panel voltage selector matches the operating voltage in your country or region.
  4. If there is still no power, check the fuse in the rear panel.  If the fuse is blown and needs to be replaced it is important to replace with same fuse type and value.

If the front panel indicator light is on but you are experiencing an audio-related or other issue, try these tips:

  1. Power-cycle the speakers by switching them off and back on using the power switch on the rear panel.
  2. Be sure the speakers are not in MUTE or SLEEP mode (if so, the front panel indicator light will be flashing).
  3. Check that the cables from your audio sources to the speaker are properly connected.  Confirm by unplugging the audio cables and then reconnecting.  Try using as many different inputs and input sources as possible to see if the problem follows.
  4. Check speaker wire connections from the left (powered) speaker to the right (passive) speaker.  Confirm by removing the speaker wire from on each speaker and reconnecting.  Also check speaker wire polarity by verifying that the wires are going to same terminals on both speakers.
  5. Verify that your audio input source components or devices are all powered on and the volume levels are turned up.
  6. If using a computer, verify that the audio output balance setting is centered for the OS and all apps.
  7. Make sure the speakers are not too close to a wall or other obstruction, which could limit bass output.
  8. Decrease the volume level of the audio input source and increase the volume of the speakers.
  9. If you are using a wireless adapter, preamp, or external DAC with these speakers, remove these (temporarily) and connect the audio source directly to the speakers.
  10. If your input source has its own EQ or other sound settings, make sure they are all temporarily turned off.
  11. Also try moving the speakers to a different location to see if something is causing interference in the current location.  Something as simple as a wireless internet router, cordless or mobile phone, or halogen lamp near the speakers can all cause interference.

A5+ troubleshooting tips - remote control

Remote control is not working or remote range is reduced.

  1. Make sure nothing is blocking the remote control receiver, which is in the left powered speaker.
  2. Check the remote battery to be sure it is installed correctly.
  3. Replace the battery with another CR2025 battery

FAQ's

You can do this using powered speakers like our A2+s, HD3s, HD4s, A5+s, and HD6s.  For this, you'll connect the W3 sender to the RCA output on the left speaker, using a 3.5mm stereo-mini to RCA "Y" cable.  Then connect the W3 Receiver to the input on your S8.  You can either use a 3.5mm stereo-mini to stereo-mini cable for this, or another 3.5mm stereo-mini to RCA "Y" cable; either will work fine.  Both W3 units will need to be powered from a USB port.  You can use USB AC power adapters, or if the powered speaker you're using is our A5+ Classic model, you can use the USB port on it's rear panel for the W3 sender. The same would apply to the S8 subwoofer if you have our current 'Gen II' model that has a USB port on the rear panel.


Absolutely!  Our speakers are safe to place sideways and, from our experience, sound great. When doing so, we recommend that you position each so the tweeters are facing outward.

The speakers we offer that are designed to have a remote control are the A5+ Classic, A5+ Wireless and HD6.

The following systems do NOT support a remote control:  512, A1, A1-MR, A2+, B2, HD3, HD4.

Yes!  As long as your speakers have an analog output (either RCA outputs or a 3.5mm stereo mini output), you can absolutely connect the S6 to your powered speakers.  With the exception of the B2, all of our powered speakers will have the outputs needed to connect the S6, this includes the original A2 and A5 models.

You can simply use RCA cables to connect the S6 to the A2+, HD3, HD4, A5+, A5+Wireless, and HD6 speaker models.

For the A1 and A1-MR speakers, you can use one side of your stereo RCA cables. Just use the left/white RCA cable, and leave the red RCA disconnected to prevent an accidental ground loop.

** Please note:  a 3.5mm/stereo mini cable will not work with the ‘Subwoofer’ output on the back of your A1/A1-MR speakers. **

No, there are no firmware updates or special drivers needed unless you own our A1-MR multi-room speakers or our B-Fi multi-room wireless streaming device.

If a firmware update is released for the A1-MR or the B-Fi, you will be notified of the update the next time you open the Audioengine Control App.  If an update is needed, simply click "update" on the DEVICES page next to the product that needs to have the firmware update applied.  The app will handle the rest of the process from there!

Standard plug-n-play drivers that are provided by your computer's OS are utilized when using the USB input on our A2+, HD3, and HD4 speaker models.

And all of our Bluetooth speakers/products are compatible with any device that supports Bluetooth, and the A2DP profile for streaming stereo audio. This includes most smartphones, tablets, and computers. For computers that don't include Bluetooth support out of the box, you can simply add a USB Bluetooth adapter.

                                          Applicable to our A2+, HD3, HD4, A5+, A5+Wireless, and HD6 speakers.

Start with power cycling your speakers by turning them off and then back on.  From there:

  1. Determine if the distortion is due to your source by disconnecting all source devices from the speakers.
  2. Please make sure all of your connector cables are in working order. Try different cables as well as a different source device.
  3. Please try using each input available (mini-jack, RCA, USB, as well as Bluetooth), one at a time, to see how the speakers react. If the distortion is unique to one speaker, when testing via RCA switch the RCA jacks (red to white and white to red) to see if the issue remains in the same channel.
  4. Make sure it is not a power issue by trying a power outlet that is on a different circuit.

If the issue persists, please click on the following link and then click on the dropdown to submit an email to our Support team:

Support Page

When doing so, please copy and paste the above troubleshooting steps along with the results of each and include this information when contacting us.

Applicable to our A1, A1-MR, A2+, HD3, HD4, A5+, and HD6 speaker models

If one of your speakers is not working (whether it be the left or right speaker), we would recommend the following troubleshooting steps:

Start by power cycling your speakers by turning them off and then back on.  From there:

  1. Check to make sure the speaker wire connecting the left and right speakers is connected according to proper polarity (Red to Gold, Black to Silver) on both ends.
  2. Please make sure all of your connector cables are in working order. Try different cables as well as a different source device.
  3. If you are using any other devices in line with these speakers, please temporarily remove them from your setup and connect the source directly to the speakers
  4. Please try using each available input, one at a time, to see how the speakers react. When testing via RCA swap the RCA jacks (red to white and white to red) to see if the issue remains in the same channel.

If the issue persists, please click on the following link and then click on the dropdown to submit an email to our Support team:

Support Page

When doing so, please copy and paste the above troubleshooting steps along with the results of each and include this information when contacting us.

In countries such as the US, Canada, and Japan the fuse is a 110-120V AC power is a 5mm x 20mm 3.15 amp @ 250 - slow blow fuse.  If you are outside those mentioned countries, please use a 220-240v is a 5mm x 20mm 1.6 amp @250 - slow blow fuse.

Nope. The 3.5mm stereo mini and RCA inputs run on the same analog circuitry and will sound equally awesome.

Absolutely!  You can connect any Audioengine speaker with an analog output to any Sonos product that has the Line-In feature.  You can also connect any Audioengine passive speakers into an existing Sonos system using the Sonos Amp.

This sometimes happens when the speakers and turntable share the same surface. The vibrations from the speakers playing feedback into the turntables stylus, causing unwanted noise. The best way to mitigate this would be to place the speakers on a different surface. If that's not an option, we'd recommend trying out some isolation stands. For larger speakers like A5+ and HD6, the ones made by Isoacoustics work well.

All turntables require a phono preamp stage before connecting to Audioengine speakers. Many turntables have this built-in , while others do not and would require an external phono preamp. Check the turntable manufacturer’s website or user manual. Some turntables may even include Bluetooth, in which case you can pair and connect them to the speakers wirelessly!

If the left speaker is in an easy to reach location, you can certainly use the physical knob to set volume. If not though, it's perfectly fine to set the speakers to a good volume and then adjust from your source moving forward. Every setup is different, so some experimentation will be necessary to find your preferred settings.

Nope! Audioengine powered speakers have amplifiers built-in. This means you don't need any extra equipment, other than a source to play music on (smartphone, / tablet, a computer, CD player, Turntable, Etc). Just plug your source directly into the inputs on the rear panel of the left speaker with the included cables, and you're listening to music!

The A5+ Classic is not officially supported by any universal remotes. It is possible to use a third party remote, but that remote needs to support IR learning. This is a feature that allows a universal remote to learn commands directly from the remote we supply. The Logitech Harmony remote, for example, is supported by the A5+ Classic.

You wouldn't be able to use a pair of headphones directly with the A5+ Classic; in order to use headphones with the A5+ Classic, you would need to include something with a dedicated headphone amp, such as our D1. All you would need to do is plug the D1 into your computer (either with an optical or USB cable) and connect the D1 from its RCA outputs into either of the inputs of your speakers.

All you would need to do is connect the variable output of the A5+ Classic into the input of your sub using RCA cables.

Yes they do! They are equipped with a power-saving circuit that turns off the speaker's final stage amp. This idle mode activates right after you stop playing music. Due to this power-saving function, it's perfectly fine for the speakers to stay on all the time!

Audioengine speakers can be easily connected to your TV set as long as there are analog outputs available. Any of our speakers will provide a greatly enhanced TV audio experience with a wider soundstage and better imaging than most sound bars.

If you’ve connected your turntable to your speakers and the volume is low, one of two situations may be happening:

If you have a turntable with a built-in phono preamp, such as the Audio-Technica ATLP120 or the Music Hall USB-1, the output may be in the wrong setting. Double check and make sure the switch is set to “line” instead of “phono.” Be careful to keep the volume of your speakers low as it can be quite loud if you had to switch it to "line".

Your turntable could also not include a built-in phono preamp, such as older turntables. If your turntable does not include a built-in preamp, you will need to add an external preamp to bring the signal up to a line level signal. We don’t have any recommendations on a particular brand or model preamp to use with this setup.

Yes, We do use solid bamboo for these speakers! The bamboo cabinets were tuned to sound the same as the MDF speakers, but the density of bamboo will give it natural acoustic advantages over MDF material.

The USB port can provide around 500mA, which is standard for high powered USB 2.0 devices; these are perfect for using a W3 or B1 for instance.

However, when trying to charge a iPad or iPhone for example, they require around 1000mA to charge with the screen on (the iPad's included USB charger actually provides around 2100mA to speed up charging with the screen on).  If your device is at a higher battery level it should work fine to plug it in to the USB power port to maintain the battery while listening to music (with the screen on it will always show "not charging").  If the battery is low though, we'd recommend plugging it into the charger that came with it.

You may have a loose volume pot.  This can happen when the nut that holds the volume pot in place becomes loose.  This can be easily accessed and tightened without opening the speakers up.  Try this:

1) Pull the plastic volume knob off the volume pot.  Depending on how tight it's on, you might be able to pull it off with just your fingers. If not, you may need to cover the knob with a soft cloth and pull out with pliers.


2) Use a deep well 10mm socket (or socket driver) to tighten the nut around the volume pots shaft.


3) Press the plastic volume knob back over the volume pot's shaft, and retest.


Sure, for A5+ Classic you will need about 100-120W.

Yes, just switch the voltage selector on the rear panel to match the AC power in your country before powering them on. We recommend changing the fuse when using a different voltage.  For 220 volts, here's the value you would need:5mm x 20mm - 1.6 amps @ 250 volts - slow blow fuse. The power cable is detachable on our powered speakers which makes it convenient to replace the AC plug with a different type if you don't want to use an adapter plug.

The A5+ Classic was designed with the user's listening experience in mind and are not marketed as pro audio mixing monitors. However, Audioengine has its roots in the studio monitor world and the A5+ Classic is quite good for this purpose. We've had customers tell us they use these for nearfield listening and music editing with excellent results.

This is normal; the volume control for the A5+ series is a digital encoder, and uses a micro-processor to attenuate the volume. The light on the front of the speakers should flash as you adjust the volume up and down; once the speakers have reached minimum or maximum volume, the light will remain solid and won't flash.

Our woofers are made of aramid fiber and the tweeter domes are silk. Both of these materials are very robust and can handle quite a bit, therefore we decided against grill covers for the A5+ Classic as they tend to negatively color the sound. Even though our speakers do not have grills they are still cat and kid-friendly!

chevron-down